> ## Knowledge Base Index
> Fetch the complete knowledge base index at: https://support.consentmo.com/sitemap.xml
> Use this file to discover available pages before exploring further.
> Pure-Markdown content can be obtained by appending a '.md' suffix to the content URLs listed in the sitemap (without the trailing slash).
# Setting a Google Compliant banner
If you are using **Google Tracking Services** in your store and operating within the **EU/EEA + UK GDPR** regions, you can do the following to comply with their requirements.
1. Please indicate clearly how the **Cookies** are being used in your store, and if your visitor gave consent through the cookie banner, they are aware that their information may be used for personalized and non-personalized ads.
A Cookie Consent Banner should have the following key components.
* **Cookie Consent Text** - Text that informs users that your website stores cookies. It should include a very brief note of why your website uses these cookies. You can use the following text sample below:
### "We use cookies to enhance your experience, analyze traffic, and personalize content. Some cookies are essential, while others help us understand how you interact with our site. You can manage your preferences at any time. We may also share information about your use of our site with our partners, including Google, for advertising and analytics purposes."
* **Preference Options** - Cookie banners should give users the option to consent, decline, or manage cookie settings when they visit your website.
* **Privacy Policy** - You can also link your privacy policy page that describes your website’s use of cookies, their categories, and how users can manage cookies.
You can edit the **Cookie Consent text** and the **Privacy Policy Link** when you navigate to the **Cookie banner** tab > **Content**, as shown in the image below:

2. You will also need to provide information about the Google Services you’re using in your store and place it on your **Privacy Policy page** together with the link to **Google’s Policy and Terms site**, as shown here: [https://business.safety.google/privacy/](https://business.safety.google/privacy/)
* In case you want to add the link of the Google Policy and Terms site to the Marketing Cookie description of the Preference popup of the Cookie banner, you can add the following HTML code below;
```html
Google Policy
```
You can navigate to the **Cookie banner** tab > **Content** section > Under the **Marketing Cookies** description and paste the HTML code, as shown below:

* In case you want to have the updated and ready text for the cookie banner with the link to the Google Policy included, you can also use the below content:
```javascript
We use cookies to enhance your experience, analyze traffic, and personalize content. Some cookies are essential, while others help us understand how you interact with our site. You can manage your preferences at any time. We may also share information about your use of our site with our partners, including Google, for advertising and analytics purposes. For more information you can check
Google Policy as well as our
```
|| After the "...as well as our" part from the above content, the default link for your Privacy Policy will appear in the cookie banner, and the final result will be as shown below:

3. To avoid common mistakes when implementing **Cookie Consent Management** in your store, please refer to **Google’s EU User Consent Policy and Checklist** here: [https://www.google.com/about/company/user-consent-policy-help](https://www.google.com/about/company/user-consent-policy-help)
# Recommended settings for the GDPR regions
## Setting up the Customer Privacy regions via Consentmo
1. **After 12th of December 2024** our app is already integrated with the Shopify API which allows you to set the regions where you need the Shopify Customer Privacy settings applied, to be set directly from the app settings.
* Navigate to the **Cookie banner** tab of our app
* Open the **Regions** section.
* **Choose the regions** where you want **the cookie banner to be displayed** and **data to be collected only after consent** and **Save** the changes.

|| NOTE: The update is applicable for installations made after the above date (12 December 2024) only.
If the instalation of the app is made before 12th of December 2024, please set the recommended regions as per these steps:
* Navigate to your store's **Settings** >> **Customer Privacy** section. In the Cookie Banner page, go to **More actions** and select **Set custom banner regions**
From the modal, choose the regions in which you want the data to be collected by Shopify after consent and click **Save**, as shown [HERE](https://youtu.be/6rX3xu4J8bg).
3. You can also change the initial state of the cookie groups in the app settings from the **Cookie banner** tab > **Behavior > Cookie banner behavior** > **Show more** > **Default mode of checkboxes** for all the cookie groups to be **un-checked initially**, as shown below:
[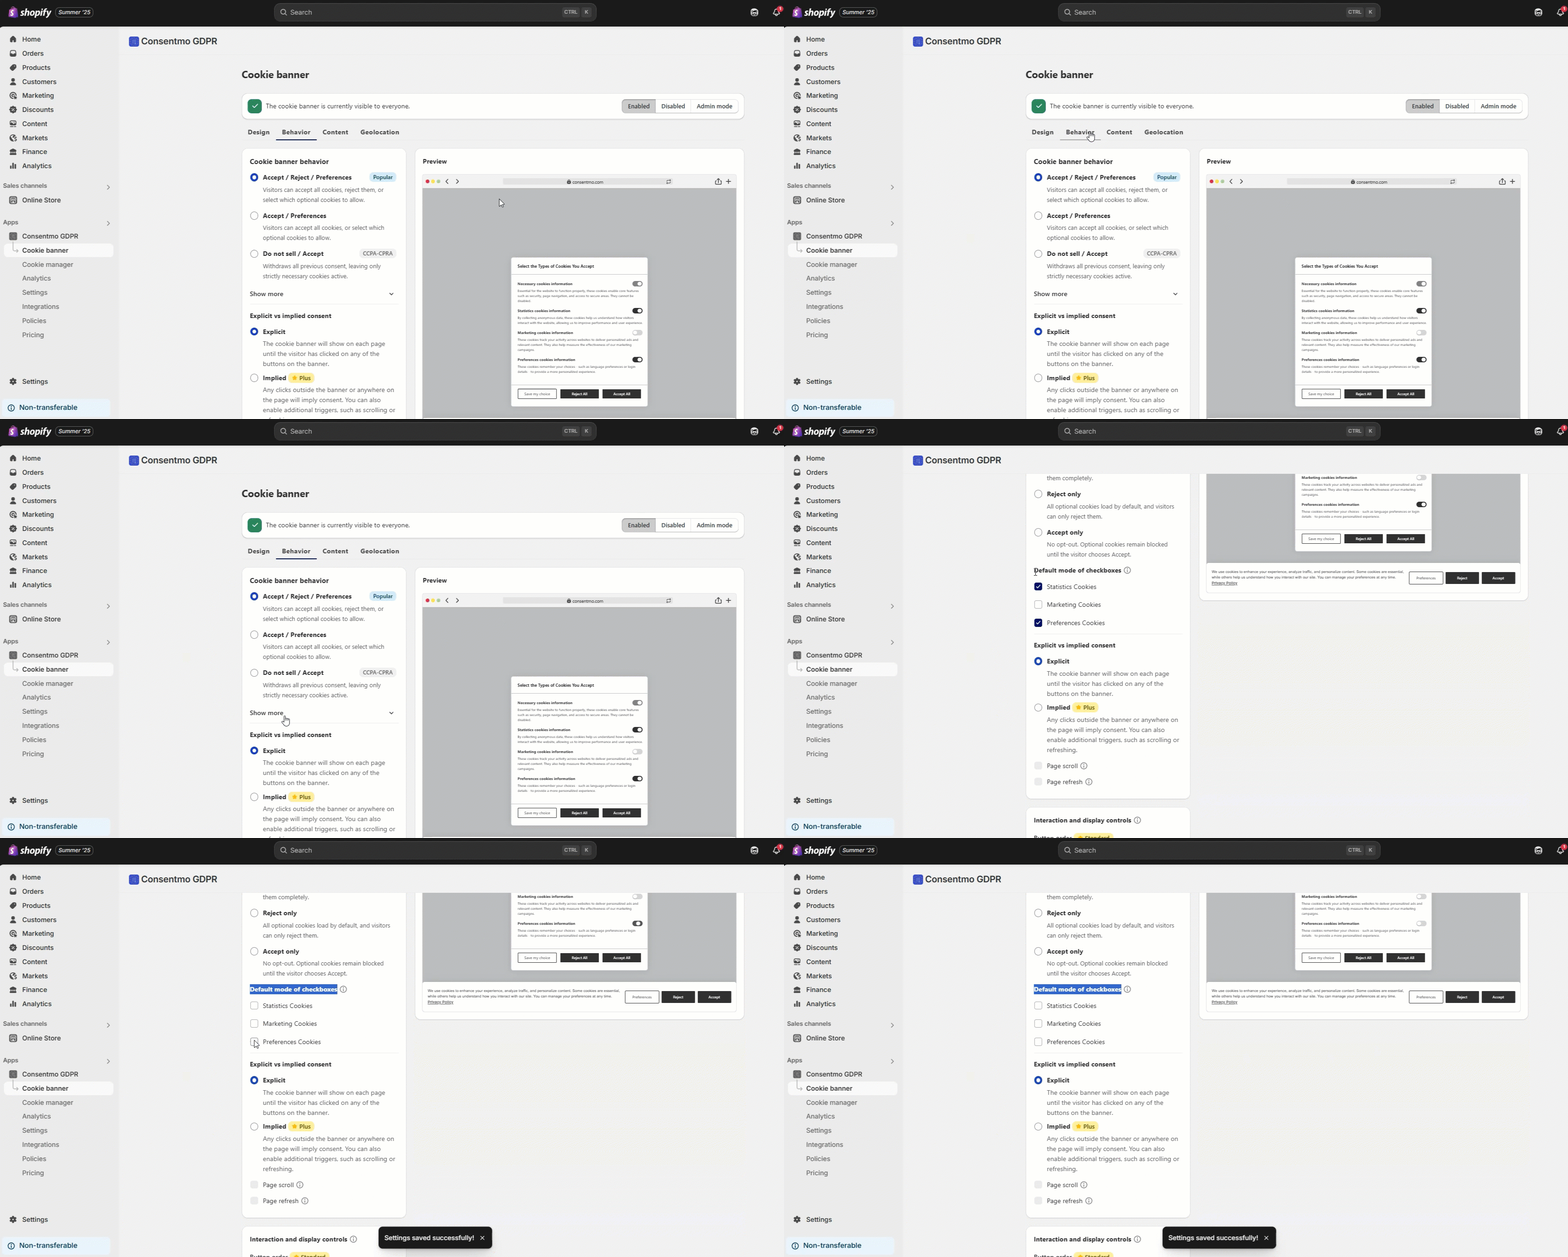](https://gdprstorage.b-cdn.net/faq/gif/initial-block-cookies.gif)
|| **Please note:** In order to make sure the app is fully integrated with the Google services in the store, you can follow the guides and steps listed below:
* [Google Consent Mode V2 Integration](/en/article/google-consent-mode-v2-integration-1olxp4x/) - manual setup
* [Google Consent Mode V2 (GCM V2) - Automatic integration](/en/article/google-consent-mode-v2-gcm-v2-automatic-integration-4tnbts/)
* [How to set the Google Tag Manager template for Consentmo GDPR CMP](/en/article/how-to-set-the-google-tag-manager-template-for-consentmo-gdpr-cmp-zlmfpg/)
* [Integration with Google for Consentmo GDPR app](/en/article/integration-with-google-for-consentmo-gdpr-app-3a1lmy/)
Once the above-listed steps are followed, the **Google Tracking Services** will be blocked, and it will only run depending on the consent given by your visitors through the **Cookie Bar** and **Preference popup**.
# Need help?
If you need help with the process, don’t hesitate to contact our support team at: [support@consentmo.com](mailto:support@consentmo.com) or from the Chat button at the bottom right corner of your browser.