
Consentmo translation with the "Translate & Adapt" app
You can follow our short guide below for your reference on how the process works.
You can start by adding our app's metafields to your theme.liquid files by following the instructions in the following article:
How to translate the app by using metafields?
Once the metafields are added, you must navigate to the app settings and refresh them from the Translation tab > "Refresh Metafields" button, as shown below:

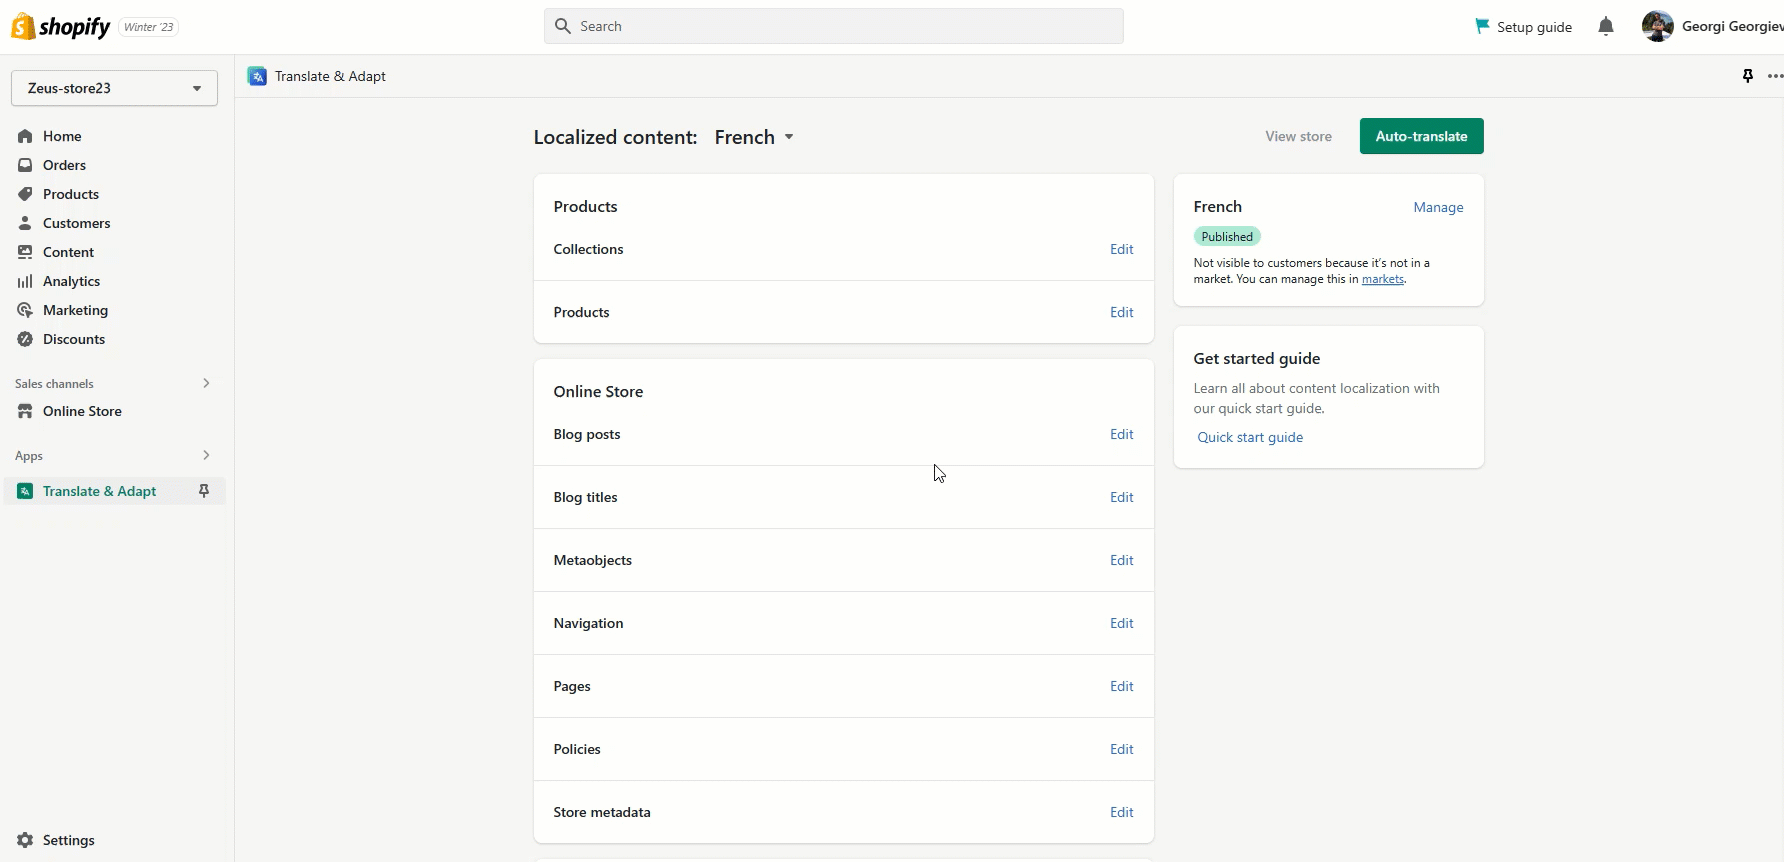
You can then navigate to the Translate & Adapt app > Localized content > "Auto-translate" button. The translation process will take several minutes or hours, depending on your store's content. Please check the image below for your reference:

If you want to translate only the content of our app, you can navigate to the Translate & Adapt app > Store Metadata section and select Edit. There you will be able to see and translate only the content of the Cookie bar and Preferences popup. As shown in the reference below, there is an option for manual and auto-translation as well:
NOTE: Please also note that this translation app has a limit for the metafields number that can be shown and translated there. So if this limit is already reached and new metafields are added to the store, they may not be visible in the translation app settings. You can double-check this with their support team, and see if they can provide a solution so the metafields can become visible there, or consider using another solution as well.
NOTE: The Translate & Adapt solution is applying double quotations marks in the HTML for the URLs that are added in the content which is translated. The result is that the translated content can not be displayed on the front end. You can fix this by manually change them back to single quotations, as shown in the example for the data collection text, containing the URL to the Compliance page linked there:

In order to ensure that the translations are applied correctly, you would need to use our "Refresh Metafields" option again.
First and foremost you need to make sure that the Compliance page you want to translate is set in the default/original store language, before proceeding with translating it to the other languages of the store. More on this can be checked in the following article: Translating the Compliance pages
Once the above is set, in the Translate & Adapt app > Pages section, locate the Compliance page and make sure to translate it to all relevant languages you have in the store.

Once the translated pages are available with a URL for each language, in order to link them properly to the Data collection text:
Navigate to the Store Metadata section of the translation app
Locate the metafield containing the Data collection text. It is called preferences_text.data_collection_text
In the translated content, make sure that the URL of the page is changed with the one for the translated page for the respective language

Lastly, you can add the Language switcher by adding a menu button to your store's Footer/Main Menu section, for each language. Below, you can check a reference of how the exact process works:
How to use different Privacy Policy link for each language in your store?
If you're having difficulty with the translation process, don't hesitate to contact our support team at: support@consentmo.com or from the Chat button at the bottom right corner of your browser.
Adding the metafields
You can start by adding our app's metafields to your theme.liquid files by following the instructions in the following article:
How to translate the app by using metafields?
Once the metafields are added, you must navigate to the app settings and refresh them from the Translation tab > "Refresh Metafields" button, as shown below:
You can then navigate to the Translate & Adapt app > Localized content > "Auto-translate" button. The translation process will take several minutes or hours, depending on your store's content. Please check the image below for your reference:
If you want to translate only the content of our app, you can navigate to the Translate & Adapt app > Store Metadata section and select Edit. There you will be able to see and translate only the content of the Cookie bar and Preferences popup. As shown in the reference below, there is an option for manual and auto-translation as well:
NOTE: Please also note that this translation app has a limit for the metafields number that can be shown and translated there. So if this limit is already reached and new metafields are added to the store, they may not be visible in the translation app settings. You can double-check this with their support team, and see if they can provide a solution so the metafields can become visible there, or consider using another solution as well.
NOTE: The Translate & Adapt solution is applying double quotations marks in the HTML for the URLs that are added in the content which is translated. The result is that the translated content can not be displayed on the front end. You can fix this by manually change them back to single quotations, as shown in the example for the data collection text, containing the URL to the Compliance page linked there:
In order to ensure that the translations are applied correctly, you would need to use our "Refresh Metafields" option again.
Compliance pages - translations and linking
First and foremost you need to make sure that the Compliance page you want to translate is set in the default/original store language, before proceeding with translating it to the other languages of the store. More on this can be checked in the following article: Translating the Compliance pages
Once the above is set, in the Translate & Adapt app > Pages section, locate the Compliance page and make sure to translate it to all relevant languages you have in the store.
Once the translated pages are available with a URL for each language, in order to link them properly to the Data collection text:
Navigate to the Store Metadata section of the translation app
Locate the metafield containing the Data collection text. It is called preferences_text.data_collection_text
In the translated content, make sure that the URL of the page is changed with the one for the translated page for the respective language
Language switchers
Lastly, you can add the Language switcher by adding a menu button to your store's Footer/Main Menu section, for each language. Below, you can check a reference of how the exact process works:
Additionally you can also check our article:
How to use different Privacy Policy link for each language in your store?
If you're having difficulty with the translation process, don't hesitate to contact our support team at: support@consentmo.com or from the Chat button at the bottom right corner of your browser.
Updated on: 11/10/2024
Thank you!